Squid is the most popular Proxy server for Unix like operating systems. It also used for the web filtering. Squid also useful as caching proxy server for the HTTP, HTTPS, FTP protocols.
This article will help you to setup Squid Proxy Server on Ubuntu 18.10, 18.04 LTS, 16.04 LTS, and 14.04 LTS systems.
Step 1 – Install Package
Squid packages are available in default yum repositories. Execute below command on your server to install SQUID proxy server.
Step 2 – Configure Squid Port
The default port for the Squid proxy servers is 3128. You can change this as per the requirements. To setup Squid on different port, Edit squid configuration file and change http_port value with new port.
/etc/squid/squid.conf
After making changing let’s restart Squid service to reload the configuration changes
The next steps will help you to Setup Squid Proxy Server on Ubuntu systems. Use only those settings, which is required for your proxy server.
Step 3 – Allow All Traffic
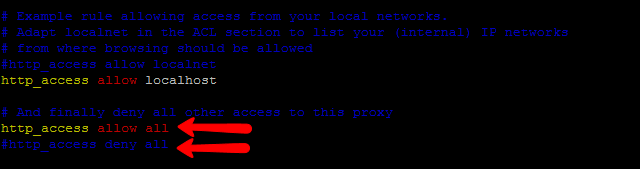
Sometimes you are required to allow all traffic on your proxy server. In Squid server open Squid configuration file. Comment the http_access deny all line and add the http_access allow all entry this file.
/etc/squid/squid.conf
Step 4 – Block Specific Website with Squid
Let’s start with the additional configuration like blocking any website using squid proxy server. Add below rules to block specific website before any allow all rules. Below example will block yahoo.com and www.rediff.com.
/etc/squid/squid.conf
If you have a long list of domain names, Create a file /etc/squid/blockwebsites.lst and put domain names one per line and add below rule in the squid configuration file.
/etc/squid/squid.conf
blockwebsites.lst file content example:
Step 5 – Block Specific Keyword with Squid
Add below rules to block specific website before any allow all rules. Below example will block all pages having keyword yahoo or Gmail.
/etc/squid/squid.conf
If you have a long list of keywords, Create a file /etc/squid/blockkeywords.lst and put keywords one per line and add below rule in the squid configuration file.
/etc/squid/squid.conf
blockkeywords.lst file content example:
Congratulation’s you have successfully install and configured Squid proxy server. Read next article to Configure Squid for Mac Address Based Filtering.
0 Response to "Cara Install Squid Proxy Server on Ubuntu 18.04 & 16.04"
Post a Comment